Apple introduced palette menus in the WWDC 2023 session What’s new in AppKit. Despite being introduced three years ago, this API isn’t mentioned often. The relevant API lives in NSMenu in the NSPaletteMenus category. This brief tutorial demonstrates how to use palette menus in your macOS apps using modern Objective-C. The code samples in this article assume your app targets macOS 14.0 or later.
What is a Palette Menu?
A palette menu is an NSMenu whose items are presented horizontally instead of vertically, making it useful for compact groups of related choices: colors, tags, flags, drawing tools, annotation filters, ratings, priorities, and other visual options.
The Palette Menu Objective-C API
@interface NSMenu (NSPaletteMenus)

// Creates a palette menu displaying user-selectable color
// tags using the provided array of colors and optional titles.
+ (instancetype)paletteMenuWithColors:(NSArray<NSColor *> *)colors
                               titles:(NSArray<NSString *> *)itemTitles
                     selectionHandler:(nullable void (^)(NSMenu *menu))onSelectionChange API_AVAILABLE(macos(14.0)) NS_REFINED_FOR_SWIFT;

// Creates a palette menu displaying user-selectable color tags
// using the provided template image, tinted using the specified
// array of colors.
+ (instancetype)paletteMenuWithColors:(NSArray<NSColor *> *)colors
                               titles:(NSArray<NSString *> *)itemTitles
                        templateImage:(NSImage *)image
                     selectionHandler:(nullable void (^)(NSMenu *menu))onSelectionChange API_AVAILABLE(macos(14.0)) NS_REFINED_FOR_SWIFT;

// The presentation style of the menu.
@property NSMenuPresentationStyle presentationStyle API_AVAILABLE(macos(14.0));

// The selection mode of the menu.
@property NSMenuSelectionMode selectionMode API_AVAILABLE(macos(14.0));

// The menu items that are selected.
@property (copy) NSArray<NSMenuItem *> *selectedItems API_AVAILABLE(macos(14.0));

@end |
@interface NSMenu (NSPaletteMenus)
// Creates a palette menu displaying user-selectable color
// tags using the provided array of colors and optional titles.
+ (instancetype)paletteMenuWithColors:(NSArray<NSColor *> *)colors
titles:(NSArray<NSString *> *)itemTitles
selectionHandler:(nullable void (^)(NSMenu *menu))onSelectionChange API_AVAILABLE(macos(14.0)) NS_REFINED_FOR_SWIFT;
// Creates a palette menu displaying user-selectable color tags
// using the provided template image, tinted using the specified
// array of colors.
+ (instancetype)paletteMenuWithColors:(NSArray<NSColor *> *)colors
titles:(NSArray<NSString *> *)itemTitles
templateImage:(NSImage *)image
selectionHandler:(nullable void (^)(NSMenu *menu))onSelectionChange API_AVAILABLE(macos(14.0)) NS_REFINED_FOR_SWIFT;
// The presentation style of the menu.
@property NSMenuPresentationStyle presentationStyle API_AVAILABLE(macos(14.0));
// The selection mode of the menu.
@property NSMenuSelectionMode selectionMode API_AVAILABLE(macos(14.0));
// The menu items that are selected.
@property (copy) NSArray<NSMenuItem *> *selectedItems API_AVAILABLE(macos(14.0));
@end
Unfortunately designing a palette menu in Interface Builder is not supported. There are two main ways to create a palette menu:
1) Use AppKit’s color-palette convenience constructors.
2) Create a normal NSMenu and set its presentationStyle to NSMenuPresentationStylePalette.
Example 1: A Simple Color Tag Palette
Here is a compact color picker for assigning a tag color:
// Helper method that builds the color tag picker.
- (NSMenuItem *)tagColorMenuItem
{
    NSArray<NSColor *> *colors = @[NSColor.systemRedColor,
		                   NSColor.systemOrangeColor,
		                   NSColor.systemYellowColor,
		                   NSColor.systemGreenColor,
		                   NSColor.systemBlueColor,
		                   NSColor.systemPurpleColor,
		                   NSColor.systemGrayColor];

     NSArray<NSString *> *titles = @[@"Red",
	                             @"Orange",
	                             @"Yellow",
	                             @"Green",
	                             @"Blue",
	                             @"Purple",
	                             @"Gray"];


     NSMenu *paletteMenu = [NSMenu paletteMenuWithColors:colors
		                                  titles:titles
		                        selectionHandler:^(NSMenu *menu)
     {
         NSMenuItem *selectedItem = menu.selectedItems.firstObject;
	 NSInteger selectedIndex = (selectedItem) ? [menu indexOfItem:selectedItem] : NSNotFound;
	 if (selectedIndex != NSNotFound)
         {
	    NSColor *selectedColor = colors[selectedIndex];
	    NSLog(@"Selected color: %@",selectedColor);
	    // TODO: Apply the selected color here.
	 }
      }];

      paletteMenu.selectionMode = NSMenuSelectionModeSelectOne;

      // Wrap the paletteMenu in an NSMenuItem.
      NSMenuItem *parentItem = [[NSMenuItem alloc] initWithTitle:@"Tag Color" action:nil keyEquivalent:@""];
      parentItem.submenu = paletteMenu;

      return parentItem;
} |
// Helper method that builds the color tag picker.
- (NSMenuItem *)tagColorMenuItem
{
NSArray<NSColor *> *colors = @[NSColor.systemRedColor,
NSColor.systemOrangeColor,
NSColor.systemYellowColor,
NSColor.systemGreenColor,
NSColor.systemBlueColor,
NSColor.systemPurpleColor,
NSColor.systemGrayColor];
NSArray<NSString *> *titles = @[@"Red",
@"Orange",
@"Yellow",
@"Green",
@"Blue",
@"Purple",
@"Gray"];
NSMenu *paletteMenu = [NSMenu paletteMenuWithColors:colors
titles:titles
selectionHandler:^(NSMenu *menu)
{
NSMenuItem *selectedItem = menu.selectedItems.firstObject;
NSInteger selectedIndex = (selectedItem) ? [menu indexOfItem:selectedItem] : NSNotFound;
if (selectedIndex != NSNotFound)
{
NSColor *selectedColor = colors[selectedIndex];
NSLog(@"Selected color: %@",selectedColor);
// TODO: Apply the selected color here.
}
}];
paletteMenu.selectionMode = NSMenuSelectionModeSelectOne;
// Wrap the paletteMenu in an NSMenuItem.
NSMenuItem *parentItem = [[NSMenuItem alloc] initWithTitle:@"Tag Color" action:nil keyEquivalent:@""];
parentItem.submenu = paletteMenu;
return parentItem;
}
To display the palette menu we simply add the item returned from the -tagColorMenuItem method to an NSMenu and present it like any other menu. The code below demonstrates how to do this:
// -showPaletteMenu: here is the action method of an NSButton.
-(void)showPaletteMenu:(NSButton*)sender
{
    NSMenu *menu = [[NSMenu alloc] initWithTitle:@"Palette Menus"];
    [menu addItemWithTitle:@"Palette Menus" action:nil keyEquivalent:@""];
    [menu addItem:[self tagColorMenuItem]]; // <-- This line adds the palette menu.

    NSPoint location = NSMakePoint(NSMidX(sender.bounds) - (menu.size.width / 2.0),
		                   NSMinY(sender.bounds) + (menu.size.height));

    [menu popUpMenuPositioningItem:menu.itemArray.lastObject
	                atLocation:location
		            inView:sender];
} |
// -showPaletteMenu: here is the action method of an NSButton.
-(void)showPaletteMenu:(NSButton*)sender
{
NSMenu *menu = [[NSMenu alloc] initWithTitle:@"Palette Menus"];
[menu addItemWithTitle:@"Palette Menus" action:nil keyEquivalent:@""];
[menu addItem:[self tagColorMenuItem]]; // <-- This line adds the palette menu.
NSPoint location = NSMakePoint(NSMidX(sender.bounds) - (menu.size.width / 2.0),
NSMinY(sender.bounds) + (menu.size.height));
[menu popUpMenuPositioningItem:menu.itemArray.lastObject
atLocation:location
inView:sender];
}
The code above gives us the following result:
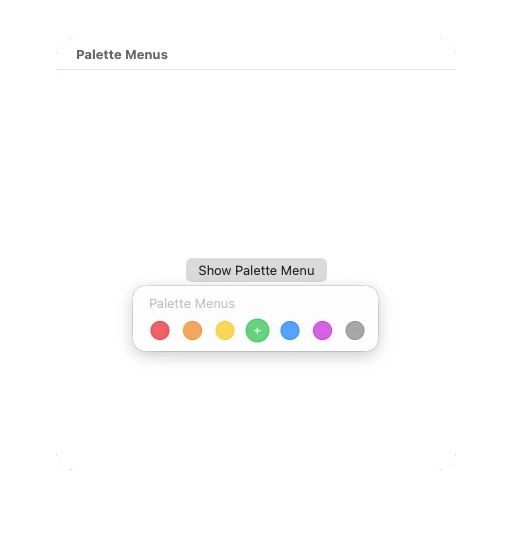
The titles are not displayed in the palette, but they are still important for accessibility features such as VoiceOver.
Example 2: A Palette with a Template Image
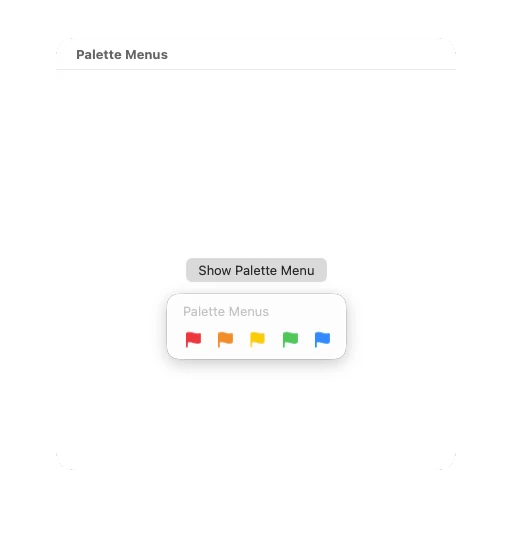
The second convenience constructor (+paletteMenuWithColors:titles:templateImage: selectionHandler:) lets you provide a template image.
This is useful when a colored symbol communicates the choice better than a plain color dot. For example we can create a flag color picker with the following code:
- (NSMenuItem *)flagColorMenuItem
{
     NSArray<NSColor *> *colors = @[NSColor.systemRedColor,
		                    NSColor.systemOrangeColor,
		                    NSColor.systemYellowColor,
		                    NSColor.systemGreenColor,
		                    NSColor.systemBlueColor];

     NSArray<NSString *> *titles = @[@"Red Flag",
		                     @"Orange Flag",
		                     @"Yellow Flag",
		                     @"Green Flag",
		                     @"Blue Flag"];

     NSImage *flagImage = [NSImage imageWithSystemSymbolName:@"flag.fill" accessibilityDescription:@"Flag"];

      __weak PMViewController *weakSelf = self;
      NSMenu *paletteMenu = [NSMenu paletteMenuWithColors:colors
		                                   titles:titles
		                            templateImage:flagImage
		                         selectionHandler:^(NSMenu *menu)
       {
	    __strong PMViewController *strongSelf = weakSelf;
	    if (strongSelf == nil) { return; }

            NSMenuItem *selectedItem = menu.selectedItems.firstObject;
	    if (selectedItem == nil) { return; }

	    NSUInteger index = [menu.itemArray indexOfObject:selectedItem];
	    if (index == NSNotFound) { return; } // This would be unexpected.

	    [strongSelf applyFlagColor:colors[index] title:titles[index]];
      }];

     paletteMenu.selectionMode = NSMenuSelectionModeSelectOne;

     NSMenuItem *parentItem = [[NSMenuItem alloc] initWithTitle:@"Flag Color"
	                                                 action:nil
		                                  keyEquivalent:@""];
     parentItem.submenu = paletteMenu;

     return parentItem;
}

- (void)applyFlagColor:(NSColor *)color title:(NSString *)title
{
    NSLog(@"Selected flag color %@ : %@",color, title);
    // TODO: Apply the color.
} |
- (NSMenuItem *)flagColorMenuItem
{
NSArray<NSColor *> *colors = @[NSColor.systemRedColor,
NSColor.systemOrangeColor,
NSColor.systemYellowColor,
NSColor.systemGreenColor,
NSColor.systemBlueColor];
NSArray<NSString *> *titles = @[@"Red Flag",
@"Orange Flag",
@"Yellow Flag",
@"Green Flag",
@"Blue Flag"];
NSImage *flagImage = [NSImage imageWithSystemSymbolName:@"flag.fill" accessibilityDescription:@"Flag"];
__weak PMViewController *weakSelf = self;
NSMenu *paletteMenu = [NSMenu paletteMenuWithColors:colors
titles:titles
templateImage:flagImage
selectionHandler:^(NSMenu *menu)
{
__strong PMViewController *strongSelf = weakSelf;
if (strongSelf == nil) { return; }
NSMenuItem *selectedItem = menu.selectedItems.firstObject;
if (selectedItem == nil) { return; }
NSUInteger index = [menu.itemArray indexOfObject:selectedItem];
if (index == NSNotFound) { return; } // This would be unexpected.
[strongSelf applyFlagColor:colors[index] title:titles[index]];
}];
paletteMenu.selectionMode = NSMenuSelectionModeSelectOne;
NSMenuItem *parentItem = [[NSMenuItem alloc] initWithTitle:@"Flag Color"
action:nil
keyEquivalent:@""];
parentItem.submenu = paletteMenu;
return parentItem;
}
- (void)applyFlagColor:(NSColor *)color title:(NSString *)title
{
NSLog(@"Selected flag color %@ : %@",color, title);
// TODO: Apply the color.
}
Bonus Tip: In this sample a stub method for -applyFlagColor:title: is shown. Note that the selection handler does not capture self directly to call the –applyFlagColor:title: method. This matters if the view controller keeps a strong reference to the menu, for example if the menu is to be reused in subsequent presentations. The menu owns its selection handler block, and blocks strongly capture Objective-C objects by default. If the block captured self, the ownership graph could become view controller -> menu -> block -> view controller, creating a retain cycle.
To avoid a retain cycle, assign self to a weak variable before creating the block, then promote it to a local strong variable inside the block. The local strong reference keeps the controller alive for the duration of the handler after it has been retrieved. The weak/strong pattern makes the lifetime behavior explicit and avoids the object disappearing halfway through the handler.
Example 3: A Manually Created Tool Picker Palette Menu
The palette menu class constructors are convenient, but they are not the only way to create a palette. To manually create a palette menu, instantiate an NSMenu instance and set its presentationStyle to NSMenuPresentationStylePalette.
menu.presentationStyle = NSMenuPresentationStylePalette; |
menu.presentationStyle = NSMenuPresentationStylePalette;
Below is an example of how you can create a tool picker palette menu:
- (NSMenuItem *)toolPaletteMenuItem
{
     NSMenu *toolMenu = [[NSMenu alloc] initWithTitle:@"Tool"];
     toolMenu.presentationStyle = NSMenuPresentationStylePalette;
     toolMenu.selectionMode = NSMenuSelectionModeSelectOne;

     NSArray<NSDictionary<NSString *, NSString *> *> *tools = @[
		@{ @"title": @"Select", @"symbol": @"cursorarrow" },
		@{ @"title": @"Pen",    @"symbol": @"pencil" },
		@{ @"title": @"Text",   @"symbol": @"textformat" },
		@{ @"title": @"Shape",  @"symbol": @"square.on.circle" },
		@{ @"title": @"Erase",  @"symbol": @"eraser" }
     ];

     NSMenuItem *initialSelectedItem = nil;

    for (NSDictionary<NSString *, NSString *> *tool in tools) {
	NSString *title = tool[@"title"];
	NSString *symbolName = tool[@"symbol"];

	NSImage *image = [NSImage imageWithSystemSymbolName:symbolName
                         	   accessibilityDescription:title];
	image.template = YES;

	// Give all menu items in the toolMenu the same target action.
 	NSMenuItem *item = [[NSMenuItem alloc] initWithTitle:title
			                              action:@selector(selectToolFromMenuItem:)
			                       keyEquivalent:@""];
	item.target = self;
	item.image = image;
	item.representedObject = title;

	[toolMenu addItem:item];

	if ([self.currentToolName isEqualToString:title])
	{
	   initialSelectedItem = item;
	}
     }

     if (initialSelectedItem != nil)
     {
	 toolMenu.selectedItems = @[ initialSelectedItem ];
     }

     NSMenuItem *parentItem = [[NSMenuItem alloc] initWithTitle:@"Tool"
                                                   	 action:nil
		                                  keyEquivalent:@""];
     parentItem.submenu = toolMenu;

     return parentItem;
}

- (void)selectToolFromMenuItem:(NSMenuItem *)sender
{
     NSString *toolName = sender.representedObject;
     self.currentToolName = toolName;
     NSLog(@"Selected tool: %@", toolName);
} |
- (NSMenuItem *)toolPaletteMenuItem
{
NSMenu *toolMenu = [[NSMenu alloc] initWithTitle:@"Tool"];
toolMenu.presentationStyle = NSMenuPresentationStylePalette;
toolMenu.selectionMode = NSMenuSelectionModeSelectOne;
NSArray<NSDictionary<NSString *, NSString *> *> *tools = @[
@{ @"title": @"Select", @"symbol": @"cursorarrow" },
@{ @"title": @"Pen", @"symbol": @"pencil" },
@{ @"title": @"Text", @"symbol": @"textformat" },
@{ @"title": @"Shape", @"symbol": @"square.on.circle" },
@{ @"title": @"Erase", @"symbol": @"eraser" }
];
NSMenuItem *initialSelectedItem = nil;
for (NSDictionary<NSString *, NSString *> *tool in tools) {
NSString *title = tool[@"title"];
NSString *symbolName = tool[@"symbol"];
NSImage *image = [NSImage imageWithSystemSymbolName:symbolName
accessibilityDescription:title];
image.template = YES;
// Give all menu items in the toolMenu the same target action.
NSMenuItem *item = [[NSMenuItem alloc] initWithTitle:title
action:@selector(selectToolFromMenuItem:)
keyEquivalent:@""];
item.target = self;
item.image = image;
item.representedObject = title;
[toolMenu addItem:item];
if ([self.currentToolName isEqualToString:title])
{
initialSelectedItem = item;
}
}
if (initialSelectedItem != nil)
{
toolMenu.selectedItems = @[ initialSelectedItem ];
}
NSMenuItem *parentItem = [[NSMenuItem alloc] initWithTitle:@"Tool"
action:nil
keyEquivalent:@""];
parentItem.submenu = toolMenu;
return parentItem;
}
- (void)selectToolFromMenuItem:(NSMenuItem *)sender
{
NSString *toolName = sender.representedObject;
self.currentToolName = toolName;
NSLog(@"Selected tool: %@", toolName);
}

In this example, a __weak self variable is not required because selection is handled with the standard target/action pattern rather than a block. The menu item invokes selectToolFromMenuItem: on its target (a weak reference), and there is no selection-handler block capturing the view controller.
Where Palette Menus Fall Short
Palette menus are useful, but they are not always the best choice. They work best when the user is choosing from a small, fixed set of options. Once the interaction becomes more complex, you may have to embed a custom view inside a NSMenuItem or choose a different AppKit control.
Palette menus also do not provide room for explanation. A horizontal row of icons or colors is compact, but that compactness comes at the cost of context. If each option needs a description, preview, secondary value, keyboard shortcut explanation, or multiple lines of text, the palette layout cannot represent that kind of interface.
Another thing to watch for is item count. Palette menus are best for small groups. Five colors, four annotation modes, or three priority levels work well. As the number of items grows, the palette becomes harder to scan, harder to fit, and less menu-like. If you have a large collection of options, use a standard menu or build your own dedicated picker.
The color convenience constructors are intentionally specialized. They work well when your menu items can be described by a simple list of colors and titles, with an optional shared template image. If each item needs its own image, represented object, validation behavior, or command handling, skip the convenience constructors and build the menu items manually, as shown in Example 3.
Finally, be careful not to use palette menus just because they look modern. A vertical menu is often better for destructive actions, rarely used choices, or options that need keyboard discoverability. Palette menus shine when the choices are visual, compact, and frequently used. If the user has to stop and decode what each item means, the palette is probably the wrong interface.